Hi friends ,
Let me show you a glimpse of my Quilling Art works of 2021.

Welcome to the world of Archana's Quilling Art: Quilling is the art in which strips of paper are rolled , shaped and glued together to make intricate designs. I started to take up small and simple projects like a Photo Frame , greeting cards etc. As and when I started doing it , it became more and interesting for me. In quilling you can use your own creativity and your own designs. ...
Hi Friends,
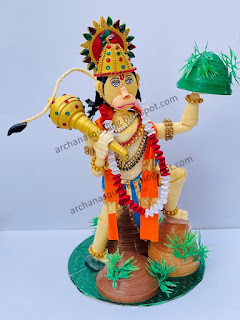 |
| Quilling Hanuman Idol |
Actually this is a gift to my husband. Initially I was not confident of doing this idol. But as my work progressed , I started gaining confidence to complete it. It took almost 15 days to complete.
I have captured few pictures while making this beautiful idol. Let me share them.
Face :


Hi Friends,
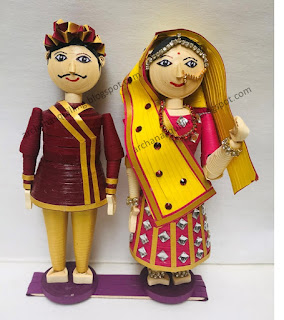
This is a cute quilling couple dolls wearing their traditional Rajasthani outfit. The girl is wearing lehanga choli and the boy is wearing kurta and pyjama set.
Hi Friends,
Lets see these cute couple wearing the Punjabi Bhangra dress.
 |
| Punjabi Couple |
 |
| Coorg Couple |
This is a cute coorg couple dressed up in their traditional outfit. Lets have a look .
Watch this space for more.....
Hi everyone,
 |
| Goddess Durga |
Mother Goddess Durga is the Goddess of Preservation, Power, Energy, Strength and Protection. I have made a quilling 3D idol of Goddess Durga. This was a great challenge for me to do it. I have made many 3D idols like Lord Ganesha , Goddess Lakshmi and many more. All these have 2 or 4 hands which was not a difficult task. Here I had to represent Goddess Durga with 8 hands each carrying a weapon. This was the most challenging part .

The body ( upper part and lower part ) were quite easy to do. After attaching these parts. I have used a red colour crepe paper and wrapped around the legs.
Then I have used green colour 5mm quilling strips to cover the waist part of the idol.
It took a bit extra work of attaching the eight hands. I had to make sure they are organized in correct manner. and I have to give space for attaching the weapons. I hope I have done justice to it. The weapons which I have made are sword , trishul , mace , bow and arrow . Additional to this I have made lotus , discus and conch. Decorate the idol with bangles , necklace and other accessories.
You can refer to the video below:
I hope you like it.
Hi Friends,
 |
| Maharashtra Couple Doll |
Come friends , lets see the Maharashtra wedding couple. Quilling Maharashtra couple dolls.
The girl is wearing a green saree. Some steps are shown below:

The other parts , you can refer my earlier posts:
Hi Friends,
 |
| Andhra couple |
Let's move to southern India. I have made Andhra pradesh quilling couple dolls wearing their traditional wedding outfit.
The girl is wearing a red saree with matching jewellery. The boy is dressed up in a white shirt and dhoti.
Watch this space for more.....
Hi friends,
 |
| Bengali Couple |
Lets now move to West Bengal and see how their traditional Dress looks like.
I have made a traditional bengali couple. The woman is dressed up in a white saree with red border.
Watch this space for more.....
 |
| Kashmiri Couple |


Hi Friends,
I am so excited to share my experience on my first Quilling dolls order. I recieved order for Quilling Yoga Dolls and Corona Warriors.
Let me show you how to pack your beautiful Quilling dolls. You have to be extra careful while packing them as they are very delicate.
Check these steps below for packing the corona warriors quilling dolls:
 |
Check my complete video on packing your quilling dolls.
I hope this post will be useful to all of you.
Hi friends,

Lets Salute our Corona Warriors for their selfless and dedicated service.
Thank you !!!!
Hi friends,
 |
| Quilling Delivery Boy |
Let me show you one more community helper who has been a true warrior during this pandemic. Our Delivery Boy. I have made this doll using quilling.
Lets thank them for their selfless service.🙏
Hi Friends,

Quilling Sweeper
Sweeper is one of the corona warriors who has helped in keeping our environment neat and clean. A heartfelt thanks to them. I have tried to make Quilling Sweeper doll. You can refer to my earlier posts for the detailed steps.
The only change is the body shape. Here the body is made using 15 quilling strips. Make a tight coil followed by cone shape .
Make the cone shape ( body ) in coordination with the face .
Watch this space for more..,...
Hi friends,
Happy Varamahalakshmi Festival to all.
 |
| Quilling Goddess Lakshmi |


Goddess Lakshmi is the goddess of wealth, fortune, power, beauty and prosperity. I have tried to do the Goddess Lakshmi idol in quilling. I hope I have done justice to it. Tried to to sitting posture of the goddess with four hands.
I have also made two quilled elephants to keep on both sides of the goddess. I felt very happy seeing the complete idol. This is one of my favourite creations in quilling.
Hope you all will like it.
You can visit my you tube link for the complete video : Quilling Lakshmi Tutorial
I will show the complete steps:
1.Face:


Hi friends,
This post for participating in # IQCG 82. The theme is a soldier along with our National Flag. Indianquillingchallenge


Lets salute all the soldiers - our real heroes , who protect our country. I have made a quilled soldier doll to pay respect to all the soldiers.
You can refer to my earlier post for the doll making steps.
Hi friends,
 |
| Quilling Policeman |
Let me start a new series of Quilling dolls - Community helpers. A community helper is a person who performs jobs that helps improve the overall well-being of the community. They keep the community safe and healthy. One such important community helper is Policeman. He is one of the corona warriors during this tough situation. I have tried to make a Policeman Quilling doll.
Let me explain the steps.
Most of the doll is made using Brown ( Khaki ) colour quilling strips. Mainly I have used 5 mm and 10 mm quilling strips.
The face part and the neck part , you can refer to my earlier posts.
1. Body ( Upper Part ) :


Hi friends,

Lets learn how to make a simple quilling doll. Click the link below for the complete tutorial.
Try making this cute doll and leave your comments
Hi Friends,
 |
| Health Care Workers |
To thank them I have made some quilling dolls. One is a Nurse and another is a Wardboy.
Let me show the details of the quilling dolls;
1. Nurse:
To make the face , hands and legs you can refer to my earlier posts.
To make the body , refer to the picture below:

Attach all the parts to complete your doll.
2. Wardboy:

Please post your comments below:
Hi Friends,

To Celebrate National Doctor's Day let us thank all the doctors for their dedicated service 🙏🙏.
I have made Quilling dolls to show my feelings for all the doctors. Lets see some cute doctors. For the basic steps of doll making you can refer to my earlier posts.
Let me share some steps:
1. Face:
The face is made using 10 quilling strips (5 mm). I have used peach colour strips. For the back part use 3 mm black quilling strip. The neck is made using a single quilling strip (5 mm). Make a tight coil.

2. Body( coat ) :
Make a tight coil using 22 quilling strips (5 mm). Make a cone shape for the body. For this doll I have used white colour strips. Apply fevicol inside the cone. You have to be very careful while making the cone. Make it in the shape of a coat. Once it dries , make the shirt , collar and the pockets by cutting the strips in appropriate shape. Put some buttons on the coat.

Make a tight coil using 5 quilling strips. I have used blue colour for the pant. Make long cone as shown. Apply fevicol inside the cone. You can refer the picture below after the face ,body and pants attached.


Refer to the picture for making the stethoscope. I have used only 3 mm quilling strips.

Make the shoes using 2 quilling strips each( 5 mm ). I have used black colour quilling strips. Draw the facial features to complete your doll.
For the girl doll I have used pink colour for the pants. You can use any colour of your choice.
I hope you liked these dolls.

