Wednesday 31 May 2017

Quilling hair clips


 Hi friends,

In this post I am showing you some beautiful variety of quilling hair clips which I made for my daughter. You can make it using any colour to match your outfit. It is also very simple and easy to make these quilling hair clips.
You need to take a plain clip and then decorate it using quilling flowers / designs.

Two clips I have attached a 3d quilling flower ( Clip No 1 and No 5 )


For another clip I have attached a fringed flower ( Clip No 2 )

 For other two I have attached a quilling shape flower ( Clip No 3 and 4 )


You can also decorate the hair clip using colourful beads or pearls.
I hope you liked these colourful quilling clips. Please share your views.

Tuesday 23 May 2017

Quilling sunflower


Hi friends ,

        Sunflower as you all know is a very beautiful flower .It always turns towards the sun. This flower is a combination of  brown and yellow colour. Today we are going to make a sunflower out of quilling .

For the center part I have used brown colour 10 mm Quilling strip.
  •  Attach two fringed quilling strips.
  • Make a tight coil.
  • Open the fringes.
For the petals , I have used 3 mm yellow colour quilling strips.
  • Attach three quilling strips and make a loose coil.
  • Give it a shape of marquise.
  • Start attaching the petals to the center part.
  • Make three such layers to complete the sunflower.
  • You can vary the size of the petals according to your choice .
For the leaves , I have used green colour handmade paper

  • Cut the paper into the leaf shape.
  • Roll the handmade paper onto a small stick / straw for the stem
  • Make two or three leaves and stick in to the stem.
  • Stick the stem to the flower.
Once your sunflower is ready , you can stick it on a chart paper and use it as a wall hanging to decorate your house.  You can also decorate your flower vase.

I hope you liked the quilling sunflower. Please share your views.


Monday 15 May 2017

Quilling 3D lotus flower

Hi Everyone,

             I am sure everyone likes the lotus flower. It has a unique beauty of its own . Here I have tried to make  a lotus flower using Quilling. I have used 3 mm quilling strips of two colours :- Light and dark pink.

The steps are shown below:

Center Part:    

        Take a 10 mm yellow colour quilling strip. Cut fringes along the strip. Then make a tight coil.


First Layer : 
  • Make a tear drop using two dark pink quilling strips.
  • Make 5 tear drops for the first layer petals.
 Second Layer :
  • Make a tear drop using one light pink and two dark pink quilling strips.
  • Make 5 tear drops for the second layer petals.

Third Layer : 
  • Make a tear drop using two light pink and two dark pink quilling strips.
  • Make 5 tear drops for the third layer petal.   

You can increase/decrease the size of the petals according to your choice.

Stick the petals layerwise to complete the lotus flower.
The complete lotus flower looks like this.


I hope you liked the quilling 3D lotus flower. Please leave your comments.
 

Friday 5 May 2017

Quilling Chhota Bheem


Hi friends ,

A very  special post for all the children who are Chhota Bheem fans. 
     As you all must be knowing about Chhota Bheem , I thought of trying a doll of Chhota Bheem using Quilling . It is very easy to make this doll. All children can try and make a chhota bheem doll for yourself.
The steps  are shown below :

Face ( Step 1 to 5 ): 

  • For the front part I have made a tight coil using 8 quilling strips( skin colour ) of 5 mm dimension. 
  •  For the back part I have made a tight coil using 8 quilling strips( black colour ) of 5 mm dimension. 
  • For the hairs make a loose coil using two quilling strips of black colour. Give it a shape as shown in step 3.
  • For the ears make a D shape using skin colour half quilling strip.
Attach all the parts and draw the facial organs to complete the face.

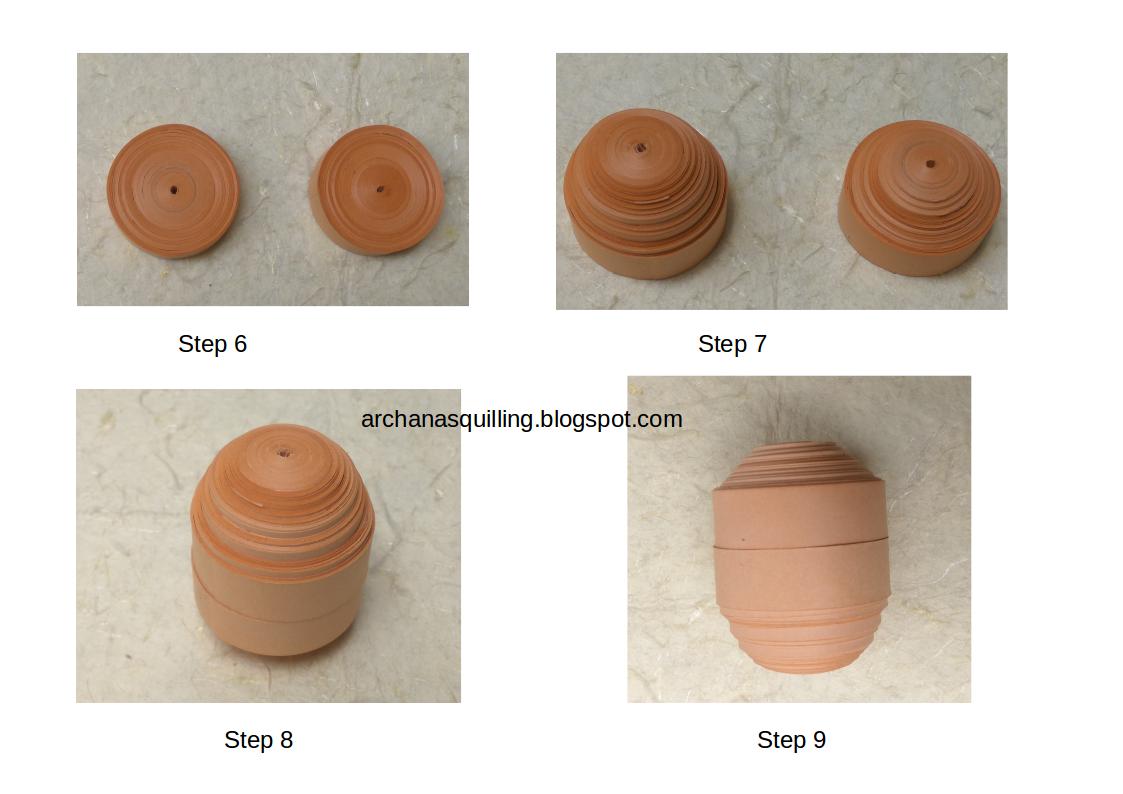
Body ( Upper Part , Step 6 to 9 ):
  • Make two tight coils using 12 quilling strips of skin colour.
  • Use 5 mm quilling strip.
  • Make a cone shape.
  • Attach them in the pattern shown to complete the body .


Body ( Lower Part , Step 10 to 12 ):
  • Make a tight coil using 12 quilling strips( 5 mm ) of  orange colour.
  • Make another tight coil using 10 quilling strips of orange colour.
  • Make cones and place the small cone on top of the big cone as shown in the picture.
  • Attach the upper part with the lower part to complete the body.

Hands and Legs ( Step 13 and 14 ):
  • Make two small cones each for the hands.
  • Make a tear drop shape using 7 mm brown colour quilling strip.
  • This makes the shoes of the doll.
 Once all the parts are complete attach them altogether to complete the Quilling Chhota Bheem doll. The complete doll looks like this:


Hope you all liked my quilling chhota bheem . Please share your views.

Watch this space for more on Chhota Bheem and his team...