Sunday 17 December 2017

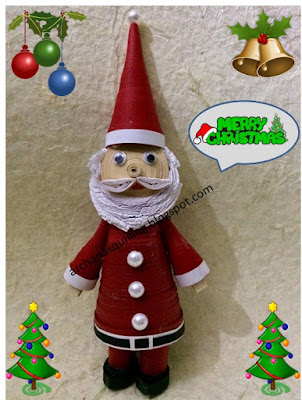
Quilling Santa Claus


Hello Friends ,

    Wishing all my friends a Merry Christmas and a Happy New Year!!!!
  Santa Claus is a legendary figure originating in Western Christian culture who is said to bring gifts to the homes of children on Christmas Eve (24 December). All children just love Santa. 

Now lets all learn how to make a Quilling Santa Claus doll. 
I have used mainly two color quilling papers : red and white

Head :
  I have made two tight coils using skin color quilling paper, each tight coil using 5 quilling strips. Attach both the coils. On one tight coil make the facial expressions. 

Cap:
   Make a cone using 5 red color quilling strips of 5 mm size. At the end of the cone put a white pearl.

Body ( coat  ):
   Make a cone using 12 red color quilling strips of 7 mm size. Put the buttons on the coat using pearls. 

Legs and shoes:
     Make three tight coils using 3 quilling strips each ( red color ).
Make a tear drop coil using 5 mm black color quilling strip.  

Attach all the body parts to complete the doll. 

Hope you all liked my Quilling Santa Claus. Enjoy your new year and have fun. 

Saturday 2 December 2017

Quilling Placard


Hi friends ,

I have tried something very unique and creative in this post. Imagine writing yours or your loved ones name in Quilling. Wow !!!! sounds great Isn't it. You can quill the name , frame it and gift to your loved ones. It is a Quilling Placard.

The materials used for this are :

  • White Kg cardboard of desired size
  • 3 mm quilling strips of different colours
  • Fevicol
  • Pollens for decoration
The detailed description is shown below:
  • First you need to write down the desired name ( letters ) on the cardboard with a pencil lightly.
  • Then we need to give the outline of the letters by placing the quilling strips in a vertical  manner.  Take care as to stick the strip on the length side so as to get embossed look and not flat.
  • Once the outline is ready , we have to fill the letters with different quilling shapes. 
  • For each letter I have used different colours. 
  • After completing all the letters , you can decorate the placard using some colourfull pollens. 
Your beautiful Quilling Placard is ready. I really enjoyed a lot doing this unique piece of art.
I made this Quilling Placard on my Wedding Anniversary to gift to my Husband.
 Hope you all will try this and post your views . 😊