Saturday 31 December 2016

Radha quilling doll


               As you all must be knowing Radha also called Radharani or Radhe, is a Hindu goddess who is almost always depicted alongside Krishna . Radha is regarded as the original Goddess or Shakti. It is declared that Radha and Krishna together constitute the absolute truth. Radha is the most important gopi in Rasa lila (sacred dance) with Lord Krishna. 

In this post I am showing you how to make the Radha quilling doll.

Face ( Step 1 to Step 3 ):
  • I have used 5 mm quilling strips. For the front part of the face I have used 5 strips of skin color
  • Attach quilling strips and make a tight coil. Slightly make a cone. 
  • For the back part of the face I have used black color . Make a tight coil using 5 strips.
  • Attach these two parts and complete the face by drawing the eyes , nose and mouth. 
    For the neck , make a tight coil using 3 skin color 5 mm quilling strips. Attach the neck to the head. 

    Hairs ( Step 4 ) :

    For the hairs , I have used black color wool and weaved plaits using that. Then I have decorated it with kundans.
    Step 4
    Once the hairs are made , you can attach it to the back part of the head.

    Body ( Upper part Step 5 - 7  ) :

    • For the upper part of the dolls body I have used red color , 7 mm quilling strip.
    • First make a tight coil by attaching 20 quilling strips .
    • Make one more coil of the same dimension.
    • Make a small cone and attach both of them in the pattern shown in the picture.


    Sleeve ( Step 8 and 9 ):

    For the sleeve , I have used 5mm red color quilling strip. I have used two quilling strips for each sleeve. Make a small cone and attach it to the body.


    Body Lower part ( Step 10 - 11 )

    For the lower part of the body , I have attached 40 quilling strips of 10 mm dimension. I have used green color, You can use any color of your choice. Make a tight coil and and make a cone .


    Attach the upper part and the lower part of the doll . Then attach it to the head ( Step 12 - 14 ) :


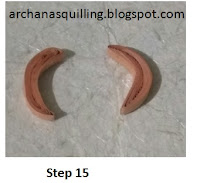
    Hands ( Step 15 ) :

     Make a loose coil and give it a shape using two skin color 5 mm quilling strip.


    Step 16 :


                      After these steps , you can take a crepe paper and wrap it around the doll like a saree. I have used blue color crepe paper for the saree. Stick a border which will make it look more elegant.
     The complete doll looks like this. You can also decorate the saree with kundans and beads.


    Hope you liked this creation of mine . Please share you views on my work. 

    Sunday 4 December 2016

    Krishna Avatar


        The eighth Avatar in the Dashavatar series is the Krishna Avatar. Lord Krishna is the most popular of all the Avatar.  In this Avatar He showed himself as the supreme statesman , warrior , hero , philosopher and teacher.  He taught the Bhagavad Gita to his disciple Arjuna on the battle field of Kurukshetra. Krishna is the eighth son of Devaki and Vasudev.

    In this post , I am showing how to make quilling doll of Lord Krishna

    Face ( Step 1 to Step 3 ):
    • I have used 5 mm quilling strips, for the front part of the face I have used 5 strips of blue color. 
    • Attach 5 quilling strips and make a tight coil. Slightly make a cone. 
    • For the back part of the face I have used black color . Make a tight coil using 5 strips. Make hairs by cutting small black color paper strips and stick it to the back of the head.
    • Attach these two parts and complete the face by drawing the eyes , nose and mouth.


    Neck ( Step 4 ) :

     For the neck , I have used 5 mm blue color quilling strip. Make a tight coil using 4 quilling strips. 


     Body ( Step 5 - 6 ) :

       For this I have used 10 mm quilling strips.  Make a a tight coil using 5 quilling strips of blue color. Make three such coils. Attach the one above the other. Attach the neck to the body.

    Legs and Hands ( Step 7 ):

    For making the dhoti , legs , feet and hands please refer to the earlier dashavatar posts .         Click here ). You can also wrap a blue crepe paper around the  dhoti to make it more elegant.     
    Step 7


      Complete Body ( Step 8 ):

    Attach the head , body and legs together . This is shown in Step 8.


    Step 8


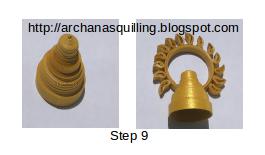
    Crown ( Step 9 ) :

    Use 5 mm gold color quilling strip for the crown. Decorate the crown with kundans.

    Flute :

    For the Lord Krishna's flute , I have taken a small cylindrical stick and wrapped golden paper around it.  

    After attaching all the parts , the complete idol of the Lord looks like this.  


    Once your quilling doll is ready , you can decorate the idol by putting a pearlbead chain to the neck of the God. You can also stick kundan in the middle . Arrange the dasara dolls during the navarathri festival. It will look very beautiful. I hope you liked my creativity of making this doll. Please share your views on this. Please watch this space for more in the Dashavatar series.

    Click below to see any avatar :


    Friday 11 November 2016

    Rama Avatar


    Rama Avatar
                    The seventh Avatar in the Dashavatar series is the Rama Avatar. In this Avatar , Lord Vishnu takes the form of Sri Rama ( ideal man ), the eldest son of King Dasharatha and queen Kausalya. Sri Rama is one of the most popular incarnations of Lord Vishnu. The well known Ramayana is the immortal epic which depicts the life of Sri Rama.

    In this post , I am showing how to make this quilling doll.

    Face ( Step 1 to Step 3 ):
    • I have used 5 mm quilling strips. For the front part of the face I have used 5 strips of blue color. 
    • Attach 5 quilling strips and make a tight coil. Slightly make a cone. 
    • For the back part of the face I have used black color . Make a tight coil using 5 strips. Make hairs by cutting small black color paper strips and stick it to the back of the head.
    • Attach these two parts and complete the face by drawing the eyes , nose and mouth.
     

    Neck ( Step 4 ) :

     For the neck , I have used 5 mm blue color quilling strip. Make a tight coil using 4 quilling strips. 


     Body ( Step 5 - 6 ) :

       For this I have used 10 mm quilling strips.  Make a a tight coil using 5 quilling strips of blue color. Make three such coils. Attach the one above the other. Attach the neck to the body.

    Legs and Hands ( Step 7 ):

    For making the dhoti , legs , feet and hands please refer to the earlier dashavatar posts .         ( Click here ). You can also wrap a blue crepe paper around the  dhoti to make it more elegant.     

    Step 7

      Complete Body ( Step 8 ):

    Attach the head , body and legs together . This is shown in Step 8.

    Step 8
     
    Crown ( Step 9 ) :

    Use 5 mm gold color quilling strip for the crown. Decorate the crown with kundans.

     Bow and Arrow :

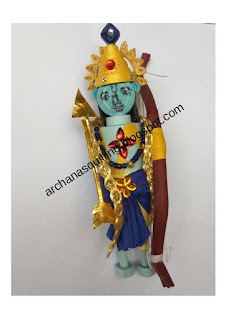
    For the bow take a small straw and bend it a little. Wrap brown color Kg cardboard around it. Tie a small thread. The bow is ready.
    For the arrow take  a small agarbatti stick and wrap golden paper around it. Refer to the idol for details.
    Stick the Bow and Arrow to the hands of the Lord.

    After attaching all the parts , the complete idol of the Lord looks like this.  


    Once your quilling doll is ready , you can decorate the idol by putting a bead chain to the neck of the God. You can also stick kundan in the middle . Arrange the dasara dolls during the navarathri festival. It will look very beautiful. I hope you liked my creativity of making this doll. Please share your views on this. Please watch this space for more in the Dashavatar series.

    Click below to see any avatar :


    Saturday 29 October 2016

    Parashurama Avatar

    Parashurama Avatar


            The sixth Avatar in the Dashavatar series is the Parashurama Avatar.  Parashurama was born to the sage couple Jamadagni and Renuka. Parashurama , a Brahmin , recieved his famous axe from Lord Shiva . Parashurama is most known for raiding the world of kshatriyas twenty - one times over , after the king Kartavirya Arjuna killed his father.


    In this post I am showing you how to make this quilling doll.

    Face ( Step 1 to Step 3 ):
    • I have used 5 mm quilling strips. For the front part of the face I have used 5 strips of skin color
    • Attach 5 quilling strips and make a tight coil. Slightly make a cone. 
    • For the back part of the face I have used black color . Make a tight coil using 5 strips.
    • Attach these two parts and complete the face by drawing the eyes , nose and mouth. 
    Hairs ( Step 4 - 7) :

    For this I have used 5 mm black color quilling strip. Make the first cone using 5 quilling strips. Make the second cone using 3 quilling strips. Make the third cone using 1 quilling strip. Stick them one on top of the other. Make the hairs and beard by cutting the black quilling strips into small fringes. Stick the hairs to the face of the Lord.


    Neck ( Step 8 ) :

                  Make a tight coil using three skin color 5 mm quilling strips.

    Step 8

      Body ( Step 9 - 11 ):

               For this I have used 10 mm quilling strips.  Make a a tight coil using 4 quilling strips of skin color. Make three such coils. Attach the one above the other. Attach the neck to the body.

    Legs and Hands ( Step 12 ):

    For making the dhoti , legs , feet and hands please refer to the earlier dashavatar posts.         ( Click here )

    Step 12


    Robe ( Step 13 ) :

    Make the robe as shown in the picture.  Wrap it around the body of the Doll. 

    Step 13

     Axe ( Step 14 -16 ) :

                Make the shape shown here using three quilling strips of grey color ( 5 mm ). Make a stick and attach them both. Stick it to the hand. 


    Stick all the body parts and complete the doll.The complete doll will look like this:


    Arrange the dasara dolls during the navarathri festival. It will look very beautiful. I hope you liked my creativity of making this doll. Please share your views on this. Please watch this space for more in the Dashavatar series.
    Click below to see any avatar :

    Saturday 15 October 2016

    Vamana Avatar


           The fifth Avatar in the Dashavatar series is the Vamana Avatar. In this Avatar, Lord Vishnu took birth as Vamana ( dwarf ) . He then approached King Bali ( grandson of King Prahlada )for a gift of land that could be covered by his three steps. When King Bali agreed to this with all devotion , Lord Vishnu covered the earth with one step  and the heaven with the other step. The third step the lord put on King Bali's head to send Bali to the nether world to be its emperor.
    In this post I am showing you how to make this quilling doll.

    Face :

    For the front part ,make a tight coil using skin color 5 mm quilling strips. Here I have used 5 quilling strips. Slightly make a curve and draw the facial organs.
    For the back part I have used black color quilling strips. Make a small curve and attach the front and back parts of the face. For details please refer to the earlier Dashavatar posts ( Dashavatar dolls )

    Neck :

    Attach 3 quilling strips ( skin color ) of 5 mm dimension. Make a tight coil.

    Body :

    Take  a 10 mm quilling strip of a light ( skin ) color. Attach 5 quilling strips and make a tight coil.  Make 3 such coils and attach one above the other. Attach the neck to the body.

    Dhoti :

    Take a 10 mm quilling strip of white color. Attach two strips and  make a tight coil. Make a cone, make two such cones and attach them adjacent to each other. You can give a simple border to make it look attractive.

    Legs :

    Take  a 10 mm skin color quilling strip . Take a 1/4 th of  a quilling strip and make a tight coil. Make two such coils which will act as legs for the Lord.

    Hands :

    Make a half moon shape with a single 10 mm skin color quilling strip and attach it to the body. make two hands for the Lord.

    Umbrella :

    As  you can see the Lord is holding an umbrella in one hand. To make this make a tight coil using 20 quilling strips of 5 mm dimension. I have used yellow color for this. Then make a curve to give it a shape of an umbrella. Make a stick with a thin cardboard stick. Fix it to the Idol.
    Attach all the body parts to complete the idol.
    This completes the quilling doll . It will look like this :


    Arrange the dasara dolls during the navarathri festival. It will look very beautiful. I hope you liked my creativity of making this doll. Please share your views on this. Please watch this space for more in the Dashavatar series.
    Click below to see any avatar :


    Monday 10 October 2016

    Narasimha Avatar


                The fourth Avatar in the Dashavatar series is the Narasimha Avatar. The Demon Hiranyakashipu was brother of Hiryanaksha (refer to Varaha avatar) and was staunch enemy of Lord Vishnu as his brother was slewed by Lord Vishnu. Ironically Prahlada was a great devotee of Lord Vishnu and son of Hiranyakashipu, because of this Hiranyakashipu tried to kill Prahalad through various means as he could not change his son's devotion.  Enraged by failures Hiranyakashipu challenged Prahlada to show where his Lord was present, and asked Prahalad if he was in a pillar to which the son replied yes, at that time the Lord Vishnu then emerged out of a pillar as Narasimha   ( Man - lion ) to  kill the demon Hiranyakashipu , as to why this form and know more you can read here

    In this post I am showing you how to make quilling doll for Lord Narasimha.

    Face (Step 1 - 4) :

    For this I have used salmon( light red ) color of 5 mm dimension. You need to roll 7 quilling strips and make a tight coil. Then make a small curve. Make two such coils and stick them together to form the front and back part of the face.
    To give it a lion look , take a single 10mm yellow color quilling strip . Cut fringes along the entire strip. Then roll the fringed paper around the face. Draw the facial organs.

    Ears :

    Make two small tear drops with half a strip and stick it on both sides of the face.

    Neck ( Step 5 ) :

    Attach three 5 mm quilling strips of salmon color. Make a tight coil.

     Body ( Step 6 - 8 ) :

               For this I have used 10 mm quilling strips.  Make a a tight coil using 4 quilling strips of purple color. Make three such coils. Attach the one above the other. Attach the neck to the body.


    Legs and hands :

                For making the dhoti , legs , feet and hands please refer to the earlier dashavatar posts. ( Click here )

                         
    Attach the body with the legs as shown here :

    Crown :

            Make a crown using 5 mm gold color quilling strips. Then decorate it using  kundans .


    Once all the body parts are completed , attach all the parts to form the complete idol. The complete doll looks like this.


    Once your quilling doll is ready , you can decorate the idol by putting a bead chain to the neck of the God. You can also stick kundan in the middle . Arrange the dasara dolls during the navarathri festival. It will look very beautiful. I hope you liked my creativity of making this doll. Please share your views on this. Please watch this space for more in the Dashavatar series .
    Click below to see any avatar :

    Sunday 25 September 2016

    Varaha Avatar


           The third Avatar in the Dashavatar series is the Varaha Avatar. In this Avatar , Lord Vishnu takes the form of a Varaha( Boar) to kill the demon Hiranyaksha. After Pralaya , at the beginning of the new Kalpa , Mother Earth was tossed about on the waves and was captured by the demon and prisioned in the bottom of the ocean. At that time Lord Vishnu took the form of a boar. He then released the Mother Earth by lifting her out of the flood waters and killed the demon Hiranyaksha, The Varaha was the only form through which the demon could have been killed because of the boon given by Lord Brahma.


    In this post I am showing you how to make this quilling doll.

    Face ( Step 1 - 6 ):

    The face is divided into two parts.

    Front part ( Step 1 - 3 ) :

        This is the mouth which is in the shape of a boar with horns.
    For this you need to make two coils and stick them one above the other. ( Here I have used yellow color quilling strip ).
    For the first coil I have attached 6 quilling strips of 5 mm dimension. Make a tight coil , then make a cone.
    For the second coil I have attached 4 quilling strips of 5 mm dimension. Make a tight coil ,  then make a cone.


    Back part ( Step 4 - 6 ):

          Attach 4 black color quilling strips of 5 mm dimension. Make a small projection to form the back part of the head. Join the front and the back part .


    Horns ( Step 7 ) :

    Here I have used 3 mm brown color quilling strips. Take half a strip , make  a petal shape . Make two of such shape to form a horn. You need to attach it to the front part of the mouth.
    Step 7


    Neck ( Step 8 ) :

    Attach 3 quilling strips of 5 mm dimension. Make a tight coil.


    Body ( Step 9 - 11 ) :

    Take  a 10 mm quilling strip of a light color. Attach 5 quilling strips and make a tight coil.  Make 3 such coils and attach one above the other. Attach the neck to the body.

    Hands ( Step 12 ) :

    Take a yellow color 5 mm quilling strip and make a loose coil. Fold on two sides to give it a rectangle shape. Bend it a little and the hands are ready. Make two hands. For making the other two hands of the Lord along with the Shankhu and Chakra please refer to the earlier Dashavatar posts. 

    Dhoti ( Step 13 and Step 14 ) :

    Take a 10 mm quilling strip of brown color. Attach two strips and  make a tight coil. Make a cone, make two such cones and attach them adjacent to each other. You can give a border to make it look attractive.


    Legs and Feet ( Step 15-19 ):

    Take  a 10 mm yellow color quilling strip . Take a 1/4 th of  a quilling strip and make a tight coil. Make two such coils which will act as legs for the Lord.

    Take a 5 mm yellow color quilling strip. Roll it and make a triangle shape. Make two such coils . This will make the feet of the Lord. Attach the legs of the Lord to the body . You can also but a beautiful border for the waist using a gold color border.


    Earth ( Step 20 - 22 ) :

    I have used 5 mm quilling strip. Attach 4 quilling strips of two colours ( green and blue ) in an alternate pattern. Make a tight coil and form a small cone shape. Make two such cones and attach both of them.


    Crown ( Step 23 ):

     I have attached two color quilling strips( Gold and blue ) and made a tight coil. Make a cone and decorate using kundan to complete the crown.


    Attach the crown to the head . Attach all the body parts. Draw the eyes  and the quilling doll is ready.


    Once your quilling doll is ready , you can decorate the idol by putting a bead chain to the neck of the God. You can also stick kundan in the middle . Arrange the dasara dolls during the navarathri festival. It will look very beautiful. I hope you liked my creativity of making this doll. Please share your views on this. Please watch this space for more in the Dashavatar series.
    Click below to see any avatar :