Sunday 26 June 2016

Quilling flowers ( part 2 )


                   Hello everyone , I hope you liked my earlier article about flowers ( quilling shapes flowers ) .  I am sure you must have made those beautiful flowers and decorated your place. In this article I will showing you a different type of flowers , they are called "Fringed flowers" .... Yes they look even more prettier when made with different colors.  Fringe flowers are one of the most popular quilling flowers. These flowers are very easy to make and look very beautiful too.

There are a wide variety of these flowers :
  • Single fringe flowers
  • Double fringe flowers
  • Cross fringe flowers
  • Double cross fringe flowers
  • Double sided fringe flowers
I will explain each one of them in detail . To make a fringe flower you need to use a thin ,  colored chart paper.  Take and keep a few colors which are suitable for flowers viz red , pink , orange , maroon etc...

Single fringe flower :


  • Cut a paper ( colored chart paper ) strip  3 cm wide and about 28 cm long ( standard A4       sheet size )  as shown in step 1. For this flower I have used red color chart paper . 
  •  Make small cuts / fringes using scissors at every 1 mm across the long edge of the strip as shown in step 2. The cuts should be about 2.5 cm deep. This will give a fringe with a narrow base. Cut gently to avoid cutting through the strip. Your fringed paper is ready. 
  • To make the flower center , take a yellow color 3 mm quilling strip  and attach it o the end of the fringed paper. Please make sure you attach it to the part of the fringed paper which is not fringed . Please refer to step 3. 
  • Roll up , starting from the narrow strip till the complete fringed strip using quilling needle. Please refer to step 4. 
  • Make a tight coil and apply fevicol at the end . Allow it to dry and remove the quilling needle from the coil as shown in step 5.
An important tip : Apply fevicol after each wind . This will keep the coil intact. 


  • Using your fingers carefully peel the fringe down and away from the center.  After peeling all the fringes , you can see your beautiful fringe flower is getting formed. Please refer to step 6. 

Isn't it lovely ?? If you take a lengthier strip you will get more fringes .  The width of the fringes can also be increased or decreased based on your choice.  You can also use two colors and join them and make a single fringe flower as shown here.

Double color fringe flower


Double fringe flower :


  •  Cut a paper strip 6 cm wide and about 28 cm long . I have used light pink color for this flower.
  • Fold it lengthwise. Please refer to step 1.
  • Create a fringe by making small cuts ( about 1 mm ) along the closed edge. Cut all along the length of the paper. The cuts should be about 5 cm deep as shown in step 2.
  • For the center of the flower take a yellow color 3 mm quilling strip  and attach it to the end of the fringed paper. Please make sure you attach it to the part of the fringed paper which is not fringed . Please refer to the step 3. 
  • Roll tightly using a quilling needle starting from the tip of the narrow strip.
  • Apply fevicol at the end and allow it to dry.


Once you finish rolling the complete coil , you will notice that some of the petals fluff up by themselves. If you want you can do it with your fingers as well.  Please refer to step 4 and 5.


Cross Fringe flower :


  • Cut a colored paper 3 cm wide and 28 cm long. I have used light green color paper. (step 1)
  • Make small cuts / fringes using scissors at every 1 mm in a slanting pattern as shown in the picture. Cut across the length of the strip at an angle. Your fringed paper is ready. (Step 2)
  • To make the flower center , take a brown color 3 mm quilling strip  and attach it o the end of the fringed paper. Please make sure you attach it to the part of the fringed paper which is not fringed . Please refer to step 3. 
  • Roll up , starting from the narrow strip till the complete fringed strip using quilling needle . (step 4).
  • Make a tight coil and apply fevicol at the end . Allow it to dry and remove the quilling needle from the coil. 
  • Carefully peel the fringes with your fingers and arrange it as shown in step 5 . 
  • See how beautiful this flower looks.


A cross fringe flower with more fringes is shown here :


Single cross fringe flower


Double Cross Fringe flower :


  • Cut a paper strip 6 cm wide and about 28 cm long . I have used dark pink color for this flower.
  • Fold it lengthwise as shown in step 1.
  • Create a fringe by making small cuts ( about 1 mm ) in a slanting pattern  along the closed edge. Cut all along the length of the paper. The cuts should be about 5 cm deep.(Refer step 2).
  • For the center of the flower take a yellow color 3 mm quilling strip  and attach it to the end of the fringed paper. Please make sure you attach it to the part of the fringed paper which is not fringed . Please refer to step 3.
  • Roll tightly using a quilling needle starting from the tip of the narrow strip. Refer to step 4.
  • Apply fevicol at the end and allow it to dry.
  • Carefully peel the fringes with your fingers  and your double cross fringe flower is ready. Please refer to step 5.


Double sided Fringe flower :

  • Cut a paper strip 3 cm wide and about 28 cm long . I have used light pink color for this flower.
  • Fold it lengthwise. Refer to step 1.
  • Create a fringe by making small cuts ( about 1 mm ) along the open  edge. Cut all along the length of the paper. The cuts should be about 1cm deep. For this flower the fringes should be very close to each other. Your fringe paper is ready. Refer to step 2.
  • After cutting the whole strip , open the fold of the fringe strip as shown in step 3
  • Roll tightly using a quilling needle starting from one end of the fringed strip as shown in step 4.
  • Apply fevicol at the end and allow it to dry. After rolling the complete strip , it will look like the image in step 5.
  • Gently peel the fringes on both the sides . You can see fringes forming on two sides. Your  double sided flower is formed. Refer to step 6.
  • Make a small tight coil of yellow color and insert it into the center of the flower.


          Fringe flowers can be used to decorate your greeting cards , photo frames , handmade bags and a lot more. You can also make a few fringe flowers and decorate your beautiful flower vase. Take a thin wire of desired size for the stem. Stick green / brown color crepe paper around it. Attach it to the flower.
Make a bouquet of colorful fringed flowers and gift it to your loved ones.

These are some of my quiling arts using fringed flowers which I have made.


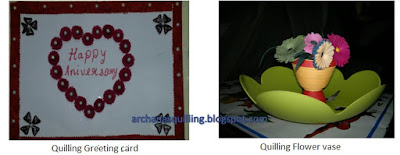
Please leave your comments and tell me how beautiful your flowers were looking.


Wednesday 22 June 2016

Quilling flowers ( part 1)


                  Hello friends, what to do say when you see a beautiful flower ? Wow !!!!! Flowers are indeed very beautiful and lovely.  Flowers when made using different color quilling paper looks even more attractive. These paper flowers are long lasting and also looks very natural.  You can create beautiful paper flowers with the basic quilling materials to decorate your place. There are a variety of flowers you can make using quilling very easily. I have divided them into three sections :
  • Quilling shapes flowers
  • Fringed flowers
  • Quilling comb flowers
In this article I will explain how to make different types of quilling shapes flowers. These flowers are made just by using the simple basic quilling shapes like tear drop , marquise , petal etc. Most of these flowers are made using 3 mm quilling strip. You can make your own patterns and combinations of these flowers and decorate your quilled greeting cards , photo frames , gift boxes , bags and a lot more.   
  • Tear drop flower 
Tear drop flower

                       First we will make the center of the flower. For that take a 3 mm yellow color quilling strip and cut it into half. Take one part and make a tight coil ( Step 1 ) . For the petals make a tear drop (how to make a tear drop) using a single pink color quilling strip ( you can take any color of your choice ) as shown in step 2. Make 6 - 8 petals of that shape. For one petal I have used one quilling strip , you can attach more number of strips based on your flower size.  Stick the petals to the center of the flower as shown in the picture. Your beautiful flower is ready.

 Once done you can use it to decorate your quilled cards , photo frames etc.  In tear drop you can also attach two colors for the petals and make a flower like this  :


You can also give an added beauty to your flower by converting it into a beautiful flower earrings. Attach a jump ring and a hook and your earrings are ready to wear.  Please refer to the picture.

Flower earrings 

  • Marquise flower
Marquise flower

For the center of the flower  take a 3 mm yellow color quilling strip and cut it into half. Take one part and make a tight coil . For the petals make a marquise shape ( how to make a marquise )  using a single purple color quilling strip ( you can take any color of your choice ). Make 6 - 8 petals of that shape. For one petal I have used one quilling strip , you can attach more number of strips based on your flower size.  Stick the petals to the center of the flower as shown in the picture. Your beautiful flower is ready.


  • Heart flower
Heart flower 

First we will make the center of the flower. For that take a 3 mm yellow color quilling strip and cut it into half. Take one part and make a tight coil . For the petals make a heart shape ( how to make heart shape ) using a single orange color quilling strip( you can take any color of your choice ). Make 5 petals of that shape. For one petal I have used one quilling strip , you can attach more number of strips based on your flower size.  Stick the petals to the center of the flower as shown in the picture. Your beautiful flower is ready.

  • Petal shape flower
Petal flower


            First we will make the center of the flower. For that take a 3 mm yellow color quilling strip and cut it into half. Take one part and make a tight coil . For the petals make a petal shape (how to make petal shape )using a single blue color quilling strip( you can take any color of your choice ). Make 6 - 8 petals of that shape. For one petal I have used one quilling strip , you can attach more number of strips based on your flower size.  Stick the petals to the center of the flower as shown in the picture. Your beautiful flower is ready.

  • Curved marquise flower
Curved marquise flower

First we will make the center of the flower. For that take a 3 mm yellow color quilling strip and cut it into half. Take one part and make a tight coil . For the petals make a curved marquise shape ( how to make curved marquise ) using a single light blue color quilling strip( you can take any color of your choice ). Make 6 - 8 petals of that shape. For one petal I have used one quilling strip , you can attach more number of strips based on your flower size.  Stick the petals to the center of the flower as shown in the picture. Your beautiful flower is ready.

          You can make any shape of your choice and arrange it in a floral pattern. 
For making different quilling shapes please refer to the link below


Using basic quilling shapes I have made a greeting card and a photo frame as you can see here :


Quilling greeting card

Quilling photo frame


                       The more creative you are , the more beautiful your flowers will look. I hope you liked my creativity and my art. Please share your views on how beautifully you were able to create your floral quilling creativity . Please await for more on flowers . 


Sunday 12 June 2016

Basic Quilling shapes


Basic quilling shapes


                Quilling starts with rolling , shaping a strip of paper into a coil and then pinching the coil into various unique shapes.  Once you create a beautiful shape , it can be used to design your greeting card , jewellery , quilling boxes , wall hangings etc.
These are different sized quilling paper which is used for quilling art.
3 mm , 5 mm , 7 mm , 10 mm , 20 mm and 25 mm.

There are various colors of quilling strips available.

In this article I am going to show you the different quilling shapes which will be useful for you to make your unique quilling art. The basic tools used for quilling are :

  • Quilling needle - This is the basic quilling tool which is used to roll the paper to make coils. You need to insert one end of the quilling strip into the slot of the quilling needle and start rolling. Keep rolling the paper until the whole strip is twisted on the quilling needle.
Quilling needle
  • Quilling comb - This looks more like a metal comb with prongs. It is used to make coils and paper flowers. The distance between the prongs can create different sized coils. It is mainly used to make evenly shaped loops inside each coil. Coils made with a quilling comb are generally bigger than those made with a quilling needle. Insert a quilling strip in between the prongs of the comb and wrap one end around three prongs to make a small loop. Then wrap the complete strip upwards. You can increase / decrease the number of wrappings around the prongs.
Quilling comb
  • Crimping tool - It is a plastic tool which is used to crimp a quilling strip to make beautiful designs. You simply need to insert a quilling strip between the two gears and rotate using the plastic handle. As you rotate, the paper strip comes out crimped. This can be used to make earrings , wall hangings , flowers and many more.
Crimping tool

Fevicol is used for sticking the coils.

I will explain the basic quilling shapes in detail.

  • Tight coil - Insert the paper strip in the quilling needle and roll it either clockwise or anticlockwise till the end . You can use your thumb and index finger for making rolling comfortable. After rolling to the desired size, apply the glue to the end of strip and  slide off the  quilling needle (remember to glue ends before you remove, else the coil will expand and you won't get a tight coil). Remove the coil and you will have a tight coil. 
Tight coil
  • Loose coil - Roll a quilling strip using the quilling needle to your desired size, remove the needle and allow the coil to relax,  and glue the end. This is called a loose coil and it is the basic shape from which many other shapes are made as explained below (viz Tear drop, Petal, Marquise, etc ... ) .
Loose coil


  • Tear drop - Make a loose coil  ( Step 1 ) as explained above and pinch the coil on one end using your thumb and index finger  ( Step 2 ) forming a shape with a point at one end and leaving the other end rounded.
Tear drop


  • Petal- Make a tear drop. Then gently press the pointed end to one side to give it a curved shape. This will give a petal shape.
Petal 

  • Marquise ( eye ) - Roll a loose coil as shown in step 1. Using both hands hold the circumference of the coil between your left and right, thumb and index fingers. Pinch the base loose coil at the opposite sides at the same time as shown in step 2 , you should see coil getting the shape as shown in the picture below.
Marquise

  •  Curved marquise ( leaf ) - Make a marquise. Then curve the pinched ends in the opposite direction using your finger nail to give a leaf shape.

Curved Marquise


  • Quilled square - Using the base loose coil, pinch on the circumference sightly (not to the extent as we make a marquise) as shown in step1 . Then turn it ninety degrees and pinch two more points exactly on the opposite to the point pinched first , ensure each side should be of the same size while forming a square ( Refer to step 2 ), alternatively you can use a quilling mould to make a square by placing on the mould.


  •   Quilled rectangle - Make a quilled square ( Step 1 ) . Then turn it slightly and pinch as        shown in step 2.  There should be two short sides and two long sides forming a rectangle.

Quilled rectangle


  •   Quilled curved half circle ( crescent ) - Make a marquise, then bend both the pinched ends upwards to get a curve . This will give the shape of a crescent moon.

Quilled cresent

  • Quilled heart- Make a tear drop. Press in the base of the shape with your finger/ needle to make a small indentation . This forms a heart shape.

Quilled heart

  • Quilled triangle -Make a tear drop. In one hand hold the tear drop between your thumb and index finger. With the other hand , press the rounded end inward to form three points to get a triangle shape.
Quilled triangle

  • Quilled cone - Make a tight coil , slightly push face of the coil with your finger or needle inwards to get a cone shape. This shape is mainly used in jewellery to  make earrings , jhumkas etc...
Quilled cone

Scroll shapes - Scroll shapes are made by rolling the quilling paper but not gluing the end. You can just roll both the ends of the paper in opposite direction , or you can fold and then roll both ends. You can make your own shape. I have mainly used two scroll shapes in my posts.

  • S - Scroll - Loosely roll one end of a quilling strip half way down. Flip the paper and loosely roll the other end in the opposite direction to form an " S " shape. Please do not glue. 
S - Scroll
  • V - Scroll - Fold the strip of quilling paper in half. Loosely roll each end outward to form a " V " shape. Do not glue. 
V - Scroll


These are the some of the quilling shapes which I have used in my articles. I hope this will be useful for you to create your beautiful quilling designs.
The more you practice , the more beautiful your quilling art will look. 
Please feel free to send your queries and comments .