Saturday 29 December 2018

Quilling Lord Jagannath

Lord Jagannath


Hi friends,

             Lord Jagannath   is a deity worshipped in regional traditions of Hinduism  in India Jagannath is considered a form of Vishnu. He is a part of a triad along with his brother Balabhadra and sister Subhadra. For details  Click here.

I have made these deities ( Lord Krishna , Balabhadra and Subhadra )  using Quilling. I will explain how to make it. Use only 3 mm quilling strips to complete the art work.

  • Take a Kg cardboard and make an outline of the God. Or you can even take a printout of the same.
  • For the eyes make a tight coil using black , white and orange colour quilling strips.
  • For the lips make a curved  marquise shape using orange quilling strip (2 strips ).
  • For the complete face fill it with black / white / yellow comb shapes.
  • For the crown I have made yellow colour tear drop shapes using half quilling strip.
  • For the chin part make tight coils of gold and yellow colour strips (half strip).
  • Make two fringe flowers (yellow colour) and stick it on both sides of the god.
  • For the Tilak make a tear drop shape using yellow , red and white colour quilling strip. 
Please refer to the picture for further reference.
Please post your comments. 
Happy Quilling.....

Saturday 15 December 2018

Christmas Special


Quilling Santa Clause and Christmas Tree.

Hello friends,

         Wishing all my friends a very Happy Christmas and a Happy New Year. I have made this Quilling Santa Clause and Christmas tree for my entry in the Indian Quilling Challenge Group IQCG # 54. I have used three colours to complete my Project. I am very happy to participate in the Indian Quilling Challenge Group. 


For the Quilling Christmas Tree , I have made a cone using green chart paper.
Make some marquise shape coils using dark green colour and stick them in a systematic pattern.
Decorate the tree using some balls , bells , stars etc....
Make a base for the tree using 10 mm brown colour quilling paper. Make three tight coils and stick them together.

For the Quilling Santa Clause I have used mainly red and white colour quilling papers.
For making Quilling Santa Clause refer here.
Hope you like my creation.
Happy Quilling.....

Sunday 9 December 2018

Quilled Name Plate


Hi friends,

This is my latest quilling creation. I made this art piece to gift to  one of my close relations. This is a Quilled name plate for her new house. I gifted  on the occassion of house warming function.
The name ( besuge ) is written in Kannada language which means joy. It really feels very happy to do quilling art work  in your own language. You can implement it in any language.

  • Take a Kg cardboard of desired size.
  • Write the name with a pencil.
  • Give an outline using quilling.
  • Fill it up with the suitable shapes.
  • You can also decorate with some quilling flowers.


 Hope you all like it. 

Monday 26 November 2018

Quilling Flower Bouquet


Hi Friends,

           All flowers are beautiful in their own way and the best way to express your love is to present a Floral Bouquet to your loved ones.  How about a floral bouquet using Quilling ??
Yes friends I have made a Quilling Flower Bouquet to gift to my husband on our Anniversary.

  • For the flowers , I have made different colors flowers ( with different sizes).  Most of the flowers are made using the basic quilling shapes. 

  • For the bouquet basket , take a brown colour Kg cardboard and stick in a pattern which gives a 3D look. Make your desired decorations. I have written " Happy Anniversary" on the Basket.

Decorate the Basket with some tight coils as shown in the picture.
Once the basket and the flowers are ready , Take a shadow Box and decorate onto that.
You can also make some leaves and bushes and stick around the bouquet.

Make your own Quilling Floral Bouquet and present it to your loved ones.
Happy Quilling....

Saturday 10 November 2018

Quilling Dolls - Musical Band Set

Hi friends,

Come , lets enter the world of quilling dolls. This I have made for participating in the Indian Quilling Challenge for November month.  You might have seen my Dashavatar dolls series. This time I have made some musical band set dolls. Each of the doll is holding a musical instrument. The basic doll dimension is the same. Only the instruments are different. I have made six such quilling dolls.

Face:
 I have used 5 mm skin colour quilling paper. Make a tight coil using 8 strips. Make a similar tight coil using black colour for the back part of the head. Attach both the parts.

Body/ costume :
 I have used 5 mm red colour quilling strips. Make three tight coils each using 10 quilling strips. Give it a cone shape. Please refer to the picture. Each of the cone is different from the other. Attach them .

 Legs/pants:
 Use 10 mm yellow colour quilling strips. Make a tight coil using 2 quilling strips. Make a long cone shape. Make two such types.

Shoes:
Make a tear drop shape using 5 mm black quilling strip( 2 strips ). Attach it to the legs.

Cap / crown:
Use 5 mm green colour quilling strips. Make a tight coil using 8 quilling strips. Give it a crown shape.

Sleeve:
Make a small cone using 5 mm red colour quilling strips( 2 strips ). Attach it to the costume.

Hands:
Make a loose coil using 3 mm skin colour quilling strips ( 3 strips ). Bend the coil to give it a hand shape. Attach it to the sleeve.
Attach all the body parts.

The description of the instruments are shown below:


The complete Musical Band set is ready. I hope you liked my creation.

Friday 19 October 2018

Quilling Kathakali


Hi friends,

Kathakali  is one of the major forms of classical Indian dance. Kathakali primarily developed as a Hindu performance art in the state Kerala. I have  attempted to do quilling art on the Kathakali face. The colourful Kathakali face interested me in doing this art work.
For this I have used only 3mm quilling strips of different colours.

  • Face - I have made tight coils using green colour quilling strips. For eyes and eyebrows I have used black colour comb flowers. For lips use red colour marquise and tear drop shapes. 
  • Beard - Make white colour comb flowers to complete the beard of the image.
  • Crown - Make fringe flowers and tight coils of different colours to complete the crown. The primary colours used are yellow , green , orange , blue and red. 
You can also give an outline to the face by placing the quilling strips in a vertical fashion. 
You can use your own colour ombination to decorate the image. 
I hope you liked my creation. 


Sunday 30 September 2018

Quilling Table Top


Hi friends,

  In this post , I am sharing a unique Quilling Table Top .  For this I have used only two colours of quilling strips ( Red and Green ). I have used 5mm dimension.

  • First you need to take a Kg cardboard ( desired dimension ).
  • The theme I have used is  a red floral bouquet.  
  • Attach two quilling strips ( red colour ) and make a coil.
  • Make 5 - 6 such coils. These coils form the petals of the flower.
  • Place the coils in a vertical position to form a beautiful flower. 
  • Stick some pollens in the center of the flower.
  • Make 5 to 6 flowers to finish the bouquet.
  • Make marquise shape ( green colour ) to form the leaves.  
Once complete , frame the beautiful quilling art and gift to your loved ones. I made this wonderful  art piece to gift my husband on his birthday. I hope you all liked my creation.

Sunday 16 September 2018

Quilling Prabhavali


Hi friends,

Happy Ganesha Festival to all my friends. I am sharing how to make "Quilling Prabhavali" , which I made on the occasion of Ganesh Chaturthi. Prabhavali is a circular or semi circular structure placed around the deity usually made from noble metals seen in temple. However for the home decoration purpose one can use materials like cardboard, thermocol etc . I have used thermocol since it is lighter and gives better structural stability than cardboard.

  • Make rough measurements based on the idol size like width, height and base. 
  • First you need to take a thermocol sheet and draw the prabhavali parts (viz, the circular arch, pillars, base ).
  • Next would be to cut the drawn pictures, here you need to be careful, in case you are using just the cutter the thermocol might break or edges might not come smooth hence it is advised to use the heat wire to cut .
  • Paint the thermocol with gold color acrylic paint. Allow it to dry. 
  • Make a base to make the Prabhavali stand. 
  • Make different types of quilling flowers which look vibrant and beautiful there is no specific advise here but choice of colors, size  and flowers are to be based on the prabhavali dimensions.
  • Stick quilling flowers ( different colors ) , leaves and branches on the thermocol .
I hope you all liked my creation. Thanks. Happy Quilling. 

Sunday 12 August 2018

Quilling Wall Decor


Hello Friends,

This is a unique decorative piece of Quilling Art. 
The materials used are:

  • Wooden Sticks ( 12 )
  •  Quilling strips of different colours( 3mm )
  • Fevicol
First stick the wooden stick as shown in the picture. You can arrange the sticks in any other pattern of your choice. Make quilling flowers of different colours and different shapes. Stick the flowers on the arranged sticks to complete the wall decor. 
Happy Quilling

Saturday 28 July 2018

Quilling designer Rakhi


Hi friends,

   As Rakhi ( Rakshabandhan ) is round the corner, here is a new quilling designer rakhi which I made for my brother.

  • Make a tight coil ( based on rakhi size) using green colour 5mm quilling strip.
  • Use 3D outliner of different colour shades to make the designer.
  • The 3D outliner gives an emboss look on the rakhi.
  • Take a thin brush and draw OM in the center.
  • Attach the silk thread to complete the designer Rakhi .


You can make your own designs to decorate your Rakhi. Happy Quilling.

Saturday 14 July 2018

Customized matching Quilling Jhumka Series - 4


Hello friends,

Here is one more customized Jhumka on which I have done Warli Art painting.
The Quilling smooth dome is done using blue color quilling paper. The warli art painting is done using light red acrylic paint .  I hope you will like it. Please share your views. 😊
Watch this space for more in this series....

Saturday 30 June 2018

Silk thread ring jhumkas


Hi friends,

Hope you have enjoyed painting a variety of quilling jhumkas. Now I am showing a new type of silk thread jhumka. I have attached the silk thread jhumka to a ring which gives a unique look to the jhumka.
These are two types which I have made. One is pink and other is gold colour.
You can put multicolour balls to decorate the jhumka.
I hope you like this creation of mine.

Saturday 16 June 2018

Painted Ganesha on Jhumka


Hi friends,

     Lets try something  new and unique painting on a quilling dome. I have made a red color smooth dome and tried to paint lord  Ganesha on it. The painting is done using gold color acrylic color.
I have also drawn a laddoo plate on the jhumka.  You can make your designs to match your outfit.
Watch this space for more....  

Sunday 10 June 2018

Customized matching Quilling Jhumka Series - 3


Hi friends,

Hope you all have tried your own matching designs. This is the third in the series.
Here I have made a black smooth dome. The design which I have made is a floral design. For this design I have used pearl white acrylic colour.
Please do share your designs. Watch this space for more in this series....

Saturday 2 June 2018

Customized matching Quilling Jhumka Series - 2


Hi friends,

Did you all try painting the jhumka with matching designs. This is the second in the series of hand painted quilling jhumka. I have made a smooth dome using blue colour quilling strip. The painting is done using black and white colour acrylic colours.
As you can see in the picture , I have drawn a lotus flower with leaves on both the sides. The outline is given using black colour.
Once the painting is done I have attached an antique silver stud and a pearl to complete the jhumka. Hope you all like this beautiful matching jhumka.
Watch this space for more in the series....
Please share your views.

Friday 25 May 2018

Handmade bags ( Quilling )


Hi friends,

  I have made some handmade bags for an order and decorated them with some beautiful quilling flowers. These bags are eco friendly and quite durable. To learn how to make the bag please  Click here . Orders are welcome. Colours can be customized.
I hope my blog visitors will appreciate my efforts. 

Sunday 20 May 2018

Customized matching Quilling Jhumka Series - 1


Hi everybody

Lets make some quilling jhumka which can perfectly match your outfit. These designer jhumkas will look very beautiful and elegant when worn. It adds an extra beauty to your outfit.

The materials required are :
  • Quilling Strips ( 5 mm )
  • Quilling needle
  • Fevicol
  • Quilling varnish
  • Triple 0 size paint brush
  • Acrylic colours
Let me show you how to do it:
  • I have made  a  tight coil using 6 quilling strips. Make the coil according to your jhumka size. Make sure you don't roll the coil very tight.
  • Make a cone using the jhumka mould. Press it evenly with your fingers to get a smooth quilled dome.
  • Apply fevicol evenly inside the cone. Allow it to dry.
  • With a pencil draw the desired drawing outside the cone.
  • Take a triple 0 paint brush and paint it with the appropriate colours. You can also make the outline using black colour. Here I have drawn some flowers with leaves. I have used yellow( for flowers )and green( for leaves ) acrylic colours.
  • Allow the paint to dry.
  • Take a thick brush and apply quilling varnish / glaze on the jhumka. First apply one coat, once it dries apply a second coat if needed.
  • This will give the jhumka a shiny look and make it water resitant.
  • Attach the jhumka stud and your matching jhumka is ready
The complete Jhumka looks like this:

I made this jhumka for an order. Make you own designs and decorate your jewellery. Please share your views. Keep watching this space for more in this series.....  Happy Quilling..

Saturday 5 May 2018

Quilling Lord Shiva Tapestry


Hello friends,

As you all know Lord Shiva is one of the principal deities of Hinduism. He is the Supreme Being within Shaivism, one of the major traditions within contemporary Hinduism. For details Click here .
I have made a portrait of Lord Shiva using Quilling.

You need to first take a print out of the Lord Shiva image ( your choice ). You need to fill the whole image with quilling with the matching colours. To complete the image I have used 3 mm quilling strips.

Shiva's crown:

   Make a loose coil using black colour quilling paper. Please make sure the coil fits correctly on the image. 

Hair locks:

  I have made the hair locks with the help of quilling comb. You can make hair locks of different length easily using the quilling comb. Click here to know more. This is also done using  black color quilling strips. 

Shiva's weapon - Trident:

Make this using gold colour quilling paper. You can also decorate the trishula using kundans,

Shiva's instrument - damaru:

Make a tight coil using white and brown colour quilling strips. Make small spokes using brown colour strips. Make sure to stick the strip on the length side so as to get embossed look and not flat as shown in the picture. 

 Shiva's serpent:

Make small tight coils using black and white quilling strips. Make many such coils to complete the body of the serpent. For the top part I have used dark maroon colour strips and placed them in a vertical position in a continous fashion. please refer to the picture. For the eyes make a marquise shape using a single black colour quilling strip. 

Draw the outline of the face and neck, Make the facial parts with appropriate colours. 

Here is the picture of the Shiva Portrait - work in progress...


Hand:

Draw the outline of the hand . Fill the space with the desired loose coils. I have used light pink colour quilling strip.

Ears:

Make a half circle shape using grey colour quilling strip for the ears.

Shiva linga:

Make a shiva linga using black colour quilling strip. For the down part make a loose marquise shape. For the upper make a dome shape and place it.  Please refer to the picture.

I made this beautiful portrait as a gift for my parents on their anniversary. 
Hope you all liked it,
Happy Quilling. 


Friday 13 April 2018

Desktop Ganesha


Hi friends,

      If interested please comment.

Silk Thread Hair Clips


Hello friends,

After making some beautiful silk thread jhumkas , now lets make something very unique using silk thread. I have made some silk thread hair clips which look very elegant.

  • For this first you need take a plain hair clip. 
  • You need to wrap the silk thread of your choice above the hair clip. 
  • Make sure you wrap the complete clip.
  • Decorate the clip using kundans , stones , pearls and ball chain.  
You can make many varieties of clips to match your outfit. Hope you liked my creation. 

Thursday 29 March 2018

Silk thread designer jhumka series - part 3


Hello friends,

This is the third silk thread designer jhumka which I have made in this series. Here I have wrapped green colour silk thread and decorated it with pearls and chakris to form a unique design. For the stud I have put pachi stud which gives an ethnic look.
You can make these designer jhumkas to match your outfit. You can make your own designs and patterns.  I hope you liked my creativity. Please share your views...
Keep watching this space for more in this series...... 

Monday 26 March 2018

Silk thread designer jhumka series - part 2


Hi friends,

This is the second silk thread designer jhumka which I have made in this series. Here I have wrapped purple colour silk thread and decorated it with stones and kundans to form a unique design.
You can make these designer jhumkas to match your outfit. You can make your own design and pattern.  I hope you liked my creativity. Please share your views...
Keep watching this space for more in this series...... 
Sunday 25 March 2018

Silk thread designer jhumka series - part 1


Hello friends,

I hope you all liked the painted jhumkas and must have tried it on your own. The next series is a set of silk thread jhumkas on which I have done some designer work. This will make the jhumka look more grand and beautiful.
For this you need to first wrap the jhumka with the desired silk thread of your choice. After completing the wraping you can decorate the jhumka with any design using stones and kundans. You can make your own designer jhumka to match your outfit. This can be worn on special occassions and functions.
Please share your views..
Keep watching this space for more in this series......

Saturday 10 March 2018

Hand painted Silk thread jhumka series - part 3


Hi friends ,

      This is the third painted jhumka in this series. I have wrapped brown colour silk thread. Above that I have painted a village art using yellow and pink colours
. You can make your own painting to make your jhumka look more elegant..
Please share your views..
Keep watching this space for more in this series......

Hand painted Silk thread jhumka series - part 2


Hello friends,

This is the second painted jhumka in this series.
Here I have wrapped light pink colour silk thread.
Above that I have made my painting art using dark blue colour acrylic paint.  I have tried to do a floral design. You can design your own art work to make your jhumka look beautiful.
Please share your views..
Keep watching this space for more in this series......

Hand painted Silk Thread Jhumka series - part 1


Hello Everybody,

      As you all must have seen my earlier posts of making Silk thread jewellery. I hope you have tried your own Jewellery making . Here I have made some painting art on the silk thread jhumka.
You can make your own  art and decorate your beautiful jhumka.
This is the first painted jhumka in this series.  

I have wrapped a blue colour silk thread jhumka .
I have used gold acrylic colour for painting.
Make sure you use a thin brush for painting.

Come lets explore painting and enjoy.
Hope you like my designs.
Keep watching this space for more in this series......


Sunday 18 February 2018

Silk thread Chandabali Jhumkas


Hi friends,

I have made a new type of silk thread jewellery which is a combination of chandabali and jhumka.
The first design has chandabali on top and jhumka bottom.
The second design has jhumka on top and chandabali bottom.
For making silk thread jhumkas and chandabalis you can refer to my earlier posts.
 Click here for silk thread jhumkas.
Click here for chandabali earrings.

Attach them using a jump ring. You can select your choice of silk thread to match your outfit.

Hope you liked this beautiful silk thread designs.
More designs arriving soon. 

Saturday 10 February 2018

Warli Art in Quilling


Hello friends ,

       Warli Art is typically referred to the paintings done by the Warli tribe located in North Sahyadri Range in India (outside of mumbai). For more details on the art you can refer to the wikipedia.
I have tried to represent Warli art through Quilling .
I have used the basic quilling shapes and designed the art work. I have used maroon colour 3 mm quilling strips to complete the picture.

Today I have drawn a simple bridal procession followed in the royal family , even today we see it in smaller scale followed in northern India . 

The procession shows pictures of big Nagari(a) drum being beaten by two persons and in the middle there is the bride sitting palanquin lifted by palanquin bearers on either side.
Another person is playing a trumpet in front of the palanquin.
We can also see dancers and person beating a dhol drum (hanging from his neck ) 

Make your own Warli art and decorate your living place. 
I hope you liked this creation. Please share your views.

Saturday 6 January 2018

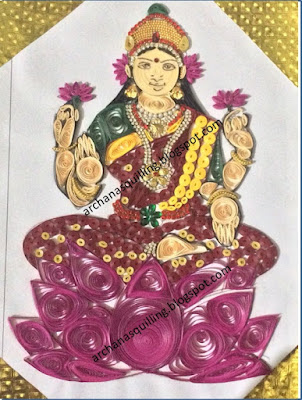
Quilling Goddess Lakshmi


Hello friends,

I wish all my friends a very happy and prosperous New Year.  Thanks for all your support. 

    Goddess Lakshmi  is the Hindu goddess of wealth, fortune and prosperity. I am here to share Quilling Goddess Lakshmi. The materials required  are :

  • White KG Cardboard.
  • Fevicol
  • Quilling Strips ( 3 mm ) different colors.
  • Stone line
  • Pearl line
  • Kundans
  • Gold Paper for decoration.
First you need to draw the outline of the Goddess on a KG cardboard. Once complete you can fill the picture with quilling coils of different shape.

Lotus:
    I have used pink colour quilling strips for this.
For the big lotus make the deisred shape coils to fit the drawing. 
For the small lotus make marquise shape and complete the lotus.

Hands and legs :
    Use skin colour quilling strips and fill the picture. For fingers I have made marquise shaped coils.

Face:
   Make a tight coil using 10 quilling strips. Draw the facial parts to complete the face.

Saree and Blouse:

  Saree  : I have made a red saree with yellow border. Make small tight coils with a single quilling strip . Arrange the tight coils in the desired design/pattern. Make the border of the saree using yellow color tight coils. 
Blouse : I have made the blouse using green color quilling strips. 

Crown:
  The crown is decorated using stone lines and kundans.

Jewellery:
      Make a necklace using white and red stone lines. This will make the godddess look more beautiful. 

You can decorate the Goddess with kundans and gold paper . I hope you liked it. Please share your views.