Saturday 28 May 2016

Quilling Wall Hangings


How about decorating your house walls with a paper quilling wall hangings ? Yes it can be done. Wall hangings can be a nature scenery or an art work . A nature scenery is a good choice to start, which would include mountains, rivers, valleys, trees, huts etc. doing all of these using paper quilling will be very interesting, this is exactly what I will be describing in my article below.  You can use your own imagination and ideas to make your landscape look more beautiful. In this typical landscape I have made use of trees, rivers, mountains, birds ,a hut , some fishes using quilling.

To make this quilling landscape I have used :
  • Kg cardboard ( white color )
  • Crimping tool
  • Quilling strips ( 10 mm and 5 mm ) of different colours
  • Quilling needle
  • Fevicol for sticking
Crimping tool

Cut a white color kg cardboard of size 30/35 cm. (you can select your own size)

Now let us look at how to make the  other landscape elements :

Tall coconut  trees :

                     Make a tight coil using 10 mm brown color quilling strip by attaching three strips. Push your finger / needle into the tight coil to make a long cone. This will give the shape of a tree and bend it slightly like shown below in the pictures else it would look a inverted ice cream cone :) . 
Tight Coil
Tree shape
Coconut tree leaves :

          Take a 5 mm green color ( light / dark)  quilling strip. Make a half moon shape and stick it. Make four to five of such types and stick in the pattern shown in the picture. To see how to make half moon please refer to my earlier posts.


Coconut 
Tree with leaves
Half moon shape


 Make the coconuts by simply making small tight coils.

Flowing river:

   Take a 5 mm blue color strip. Crimp it using crimping tool. ( refer to picture ) .

Crimped quilling strip

 At the bottom of the sheet, stick the whole strip in such a pattern, so as to look like waves . For the upper flow of water, cut the strip into required size and stick in this pattern ( refer to picture ) Take care as to stick the strip on the length side so as to get embossed look and not flat as shown in the picture, this will need some time and practice. 


River

Cute fishes :
              Take 3 mm quilling strips of different colours. Make a tear drop , a marquise shape and a petal shape and stick them together , use petal shape for tails , marquise for body and tear drop for fins to make the form of a fish as shown in the picture. Draw the eyes of the fish with a black sketch pen.

Complete quilling fish
Parts of fish ( Click for enlarged picture )


Hills :
           Take a 5 mm brown color strip. Crimp it using crimping tool. Stick the crimped strip in a zig zag pattern to give it a look of the mountain.


Hill Range


Sailing boat :
         Take 3 strips of 5 mm size , join them and make a half moon shape. 
Next join three 5 mm quilling strips of different colors and make a tight coil. Leave it loose, pinch at three points to make a triangle shape. Join these two shapes and your (yatch) boat is ready.

Parts of boat

Complete quilling boat


Birds :
          Make two half moon shapes using a 5 mm quilling strip. You can use a black or grey colour  for the bird.. Stick the two half moon shapes in the pattern shown below. Your birds are  ready to fly fly fly.

Flying Birds


Hut :
          Join three quilling strips ( 5 mm ) of red color and make a lose coil.  Make a triangle . The roof is done . Now for the hut join four strips ( 5 mm ) cream colour and make a loose coil. Using your fingers make the four ends sharp to get a square shape. Join these two to complete your hut.

Hut


Sun


Shinning sun:
         Use a yellow color 5 mm strip and make a tight coil.  For the sun rays make small triangles  and stick it around the tight coil. The sun is ready.

Once all this done, stick them on the kg cardboard as per your choice. You can do light shading of colours to make your landscape look more colourful. You can use your own creativity  to design your quilling landscape. 
After completing , frame your landscape for hanging on the wall and see how beautiful and natural it looks.  

Please feel free to share your views and wait for more on wall hangings .. 

Saturday 21 May 2016

Colourful Quilling Basket


When you first look at this basket,  what do you feel? You might feel it to be very  complex ? No , this basket is made with simple basic quilling shapes and I will share a technique to join them using which it will be a simple task. The shapes of different colors are glued together to make the basket look attractive and beautiful. You can create your own design and shapes. To make your own quilling basket look more colorful , you can use various colour combinations.

To make this basket , you will need :
  • 10 mm quilling strips of different colors
  • Quilling needle
  • Crepe paper ( for handle )
  • A bowl based on the size of your basket
  • Fevicol (Gum used for joining quilling shapes)
Here I have used only 10 mm quilling strips of different colors.
  • First you need to plan the size of your basket. Take a bowl or basket of desired size, place the coils on the bowl to get the perfect basket shape.
Size for your basket

  • You have to start the basket from a base. Here I have used yellow coloured quilling strips . You can use any colour of your choice.
  • Take 3 yellow color strips, stick them together to make a longer single piece using fevicol.
  • Then roll the strip to make tight coil, apply fevicol at the end of the strip. Now my base coil is ready .
Base coil
  • For the next layer of the basket I have used 11 dark pink color marquise shape . You can refer to my earlier posts to know how to make this shape.

First layer of the basket


Marquise shape

  • As and when you make a shape, put fevicol on the top of the coil to make it stiff.
  • Stick the first layer in a flower shape as shown in the picture.

  • For the second layer I have used 11 cream color tear drop shape as shown in the picture. Stick them in between the marquise shape as shown in the picture . Don't forget to apply fevicol on the top of the coil and allow it to dry.
Second layer of the basket

Tear drop shape

  • Then I have arranged 11 blue coloured tear drop shape in between the cream colour.
  • Stick the coils in a diagonal pattern on the edge of the base to build up the height of the basket 
  • Stick as many layers as you want your basket to reach the desired shape and height.
After sticking all the layers

Once you stick all the coils, keep it in the plastic bowl for 2-3 days so that your basket gets its shape, otherwise the fevicol might not harden and the shape might get altered. 

Now we will make the handle for the basket :
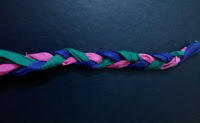
  • Take three rectangular  crepe papers of different colours.
Crepe Paper

  • Stick all the three strips at one end.
  • Weave into plaits from the sealed end , till the end of the paper. ( Please refer to the picture )
Weave into plaits

  • Stick at the other end also. Your handle is ready .
Stick the handle to the basket at 2 opposite ends. Your quilling basket will look like this.

Colourful quilling basket

Please watch the video for more detailed instructions on how to make the basket.


I have made a small quilling colourful basket which is shown here.

Small quilling basket


Your colourful basket is ready. You can give this basket as a gift or use it as a decorative item. You can put flowers or some light items into your basket. I hope you liked this creativity of mine. I enjoyed the most doing it. Please feel free to share your views.

Keep watching this blog for more exciting new quilling items 

Saturday 14 May 2016

Quilling handmade bag


Quilling Handmade bag


      Are you one of those who are looking forward to save environment and stop using plastic bags  ? Then you have landed on the right page, you can make your own handmade paper bag for either decorative purpose (like the one shown in picture above), for gifting purpose or which is quite sturdy to carry weight and of course is also environment friendly.  A handmade paper bag can be made of any size. These bags can be fashioned out of any patterned paper , handmade paper , colored paper  or newspaper.

In the example below, I have used a pink color handmade paper to make a decorative gift bag.


The materials required are :
  • Handmade paper
  • Feviol
  • Scissors.
  • Quilling strips
  • Quilling needle
  • Satin ribbon
Now I will explain the steps of doing the bag.

You can make your handmade bag of any size. I have used a handmade paper of size 20/20 cm. 

  • Cut the handmade paper into a square of size  20 / 20 cm. 
Square 20/20 cm

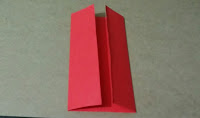
  • Fold right side 5 cm and left side 5 cm.
Fold right side 5 cm and left side 5 cm


  • Turn the paper , fold right side 8 cm and left side 8 cm.
Right side 8 cm,left side 8 cm


  • Fold all the sides at the mark, as you can see the shape of a box is getting formed.
Folding at the mark

  • Fold at 5 cm for all the sides.


Foldings on all sides
  • Use fevicol to seal the edges of the bag.
After sealing the bag
  • After sticking , your bag will look like this 

Bag after sticking

  • Put the handle using ribbon or thread to complete the bag.
Ready bag


Once our handmade  bag is ready , you can do your own quilling designs to make it look more attractive. I have used flower as a quilling pattern on the bag. You can also write your message or decorate it with beads and have fun .

Please watch the video for detailed instructions of making the bag.


You can get really get creative with the way you decorate your handmade bag. This bag can be useful to gift it to your friends . It can also be an interesting craft activity for kids during holidays.

Please share your views and tell me how your beautiful handmade bag was useful to you. Keep watching this space for more on handmade bags.  Next I will show you a bag which is more sturdy and can be used for daily use. 

Saturday 7 May 2016

Quilling greeting card


                    Thinking of where , what type of card to buy for your loved ones , think again!! these cards are not just expensive, but they don't have your personal touch . Now you can make your own handmade lovely quilling greeting card which will make your loved ones very happy.  This card is very easy to make and looks very beautiful. A handmade card is more precious than a gift. This elegant and simple quilling card is sure to put a smile on the receiver's face. A handmade quilling greeting card can be made for any occasion like birthdays, anniversaries, festivals etc. You can use your own designs and imagination. For greeting cards the quilling patterns are versatile.. You can create a variety of designs like flowers , leaves, fringed flowers , snowflakes etc.


Quilling birthday card


For this greeting card I have taken beautiful colorful flowers  as my theme.

The materials required are:
  • Card paper / KG cardboard 
  • Quilling strips ( 3 mm - different colors )
  • Quilling needle
  • Fevicol
First, I will teach you how to make the leaves :
  • Take a 3 mm quilling strip of green color.
  •  Create a tight coil, do not glue it, lay it on a flat surface and let it expand. 
  • Pinch the coil using your thumb and index finger forming a shape with a point at both the ends. ( refer to picture below) slightly to give it a curve . 
  • Then glue it. 
Quilling leaf

Your leaf is ready. Make as many leaves you want for your card.  

For making the spiral leaf ,  take a 3 mm quilling strip, roll it  half and leave it loose. This will form a spiral shape ( refer to picture ). 

Spiral leaf


To make flowers,  I have used 3mm quilling strips of different colors


These are the types of flowers used :
    Tear drop shape(click to enlarge)
  • Tear drop - make a tight coil, leave it loose ,  pinch the coil using your thumb and index              finger forming a shape with a point at one end  and leaving other . Make 5 to 6 of this                shape to form a flower.

Petal shape (Click to enlarge)


  • Petal - make a tear drop, then gently press the pointed end to one side to give it a curved shape.
Marquise shape (Click to enlarge)
  • Marquise -  make a coil , leave it loose , then pinch both the ends with a point at both the ends to give it an eye shape. Make 5 to 6 to form a flower. 
 Heart shape (Click to enlarge)
  • Heart shape - make a tear drop , press in between the round shape to get a heart shape. Make 5 to 6 of this shape. 
  • Half moon (Click to enlarge)
  • Half moon -  pinch both the ends of a coil to make a half moon shape. These also you can make 5 to 6 to form  a flower.
You can make any desired shape of your choice to form the petals of the flower. Once the flowers and leaves are made , stick them on a card paper / KG cardboard in a beautiful pattern.
You can also write your message using quilled paper.

Please watch the video for detailed instructions on how to make a flower. 


By making a marvellous heart flower , you can make your dearest sweetheart's heart melt with this card. In this section I am making  fringed flowers. Fringed flowers are the most popular quilled flowers and easy to make.


Materials required:

  • Card paper
  • Quilling needle
  • Quilling strips ( 5 mm )
  • Fevicol
  • White pearl 
        Take a card paper and draw a heart shape with a pencil . 
  • Take a 5 mm red color quilting strip.
  • Uses scissors to fringe the strip all the way to the quilling strip , but be careful not to cut the quilling strip.( refer to picture )


Cutting of fringes (Click to enlarge)


  • Start rolling the quilling strip. Make sure that when you roll the strip , the fringed part is on the upper part of the quilling strip. Continue rolling the whole strip. Once finished , put a bit if glue at the end of the strip and allow it to dry. ( Refer to picture )

Rolling of strip (Click to enlarge)


Flower after rolling


  • Use your fingers to carefully peel the fringe down and away from the center.Use your thumb to squash it all the way down.


Final Fringed Flower

Make as many fringed flowers as you want and stick it on the heart shape.


 If you want you can stick a pearl / bead in the center of the flower as shown in the picture. 
Your greeting card is ready !
Write your own message to complete your greeting card.

     Quilled flowers and hearts express  sweet sentiments for special occasions .

Please do share your views on how beautifully you were able to make your own greeting card.