Saturday 29 April 2017

Quilling spiral earrings


Hi friends ,

            In this post I am showing a different and simple quilling earrings. This earrings can be made as a stud as well as a hanging. My daughter gifted me this beautiful earrings on my birthday . Thought of sharing with you all.
It can be made using a single colour quilling strip or dual colour .
You need 3 mm quilling strips for this.
Here we have used two colours ( Red and white ) quilling strips. 

The steps are shown below ( Step 1 - 8 ) :
 
 The final earrings will look like this . You can decorate it using kundans.


One more single colour stud which I mentioned above is shown below:


You can decorate this also with colourful kundans.
I hope you liked this earrings .


Friday 21 April 2017

Quilling jewellery set


Hello everybody,

This is a simple jewellery set specially made for your little kids (girls). This jewellery set includes a necklace and earrings. I have made this using different types of quilling comb flowers. For making comb flowers please Click here

I have made two jewellery sets.

Jewellery set 1:                                           

 To make the complete flower , please refer to the steps below:


For the earrings you need to use only one petal of the flower. For the necklace use the complete flower.
After completing the flower attach the necklace chain. For the earrings attach the jump ring and earring hook.
                   

Jewellery set 2:

                                         
For this you need to make a husking flower . To watch the complete video please Click on the link 
For the earrings you need to use only one petal of the flower. For the necklace use the complete flower.
After completing the flower attach the necklace chain. For the earrings attach the jump ring and earring hook.

You can make these jewelley sets using any colour of your choice. 
This beautiful jewellery set you can make for your beautiful daughters or gift it to your loved ones. I hope you liked this creativity of mine.
Thanks everyone. Please share your views.


Wednesday 19 April 2017

Quilling Tiny tots


Hi friends ,

In this post I am sharing some beautiful quilling jhumkas which I have named as tiny tots. As the name suggests these jhumkas are very small in size and looks cute too. These can be made using multiple colours to match your outfit.
It wont take much time to make these jhumkas as you need to roll less number of strips. I have made 5 different colours of jhumkas.
Lets have a look :


I hope you liked my tiny jhumkas . Please let me know which colour you tried and how was it looking. Please share your views.

Saturday 15 April 2017

Quilling flower vase


Hi friends ,

I hope you all must have seen my earlier post where I had showed you how to make a quilling flower vase. Here I am showing you a new and different type of a quilling flower vase. This flower vase I made for my husbands birthday. It is a beautiful piece of art to gift your loved ones.

The complete making of the quilling vase is divided into two parts :

  • The Lower part
  • The Upper part.

To make this vase you mainly need :
  • 10 mm quilling strips ( two different colors )
  • Quilling needle
  • Fevicol 
Lower part :
        For the lower part of the vase I have used yellow and red color quilling strips . You can choose any color of your choice. Here I have attached  50 quilling strips( one red one yellow ) in an alternate fashion. The number of strips depends on the size of your vase.You can vary ( increase / decrease ) it according to your vase size.  
  • Take a 10 mm yellow color quilling strip.
  • Apply fevicol at the edge.
  • Attach a red color quilling strip to it.
  • Same way attach 50 strips in an alternate fashion..
  • Make a tight coil.
 As  it is difficult to roll 50 strips altogether , you can roll 10 strips at a time , make a coil . Again attach 10 strips and so on ... This will make the coiling easier.

Do not apply fevicol on the top and bottom of the coil.  Do not allow the coil to become loose. If your  coil becomes loose , you will not be able to give the correct shape to your vase. 

          Using your thumb , gently  push the central part of the coil to give it a pot shape. To make the base flat , you can gently press the end of the pot against a flat surface. Apply fevicol inside the pot to make it firm , applying fevicol keeps the vase in shape and allow it to dry.
The top view of the lower part is shown below:
 

Upper part :

The upper part of the flower vase is further divided into two parts:

Upper part 1:

  • Roll 40 quilling strips( red and yellow ) in an alternate fashion.
  • Make an open coil instead of a closed coil. The purpose of an open coil is to put flowers inside your vase. You can take a marker or any cylindrical shape object and start rolling upon that.
  • In a similar fashion roll 40 quilling strips.  
  • Using your thumb , gently  push the central part of the coil to give it a pot shape. Please make sure this part is open on one end. 
  •  Apply fevicol inside the pot to make it firm , applying fevicol keeps the vase in shape and allow it to dry. 
  • Attach the lower part with the upper part in such a way that it takes the form of a vase. 
Upper part 2 :

  • Roll 15 quilling strips( red and yellow ) in an alternate fashion.
  • Make an open coil instead of a closed coil. You can take a marker or any cylindrical shape object and start rolling upon that.
  • In a similar fashion roll 15 quilling strips.  
  • Using your thumb , gently  push the central part of the coil to give it a pot shape. Please make sure this part is open on one end. 
  •  Apply fevicol inside the pot to make it firm , applying fevicol keeps the vase in shape and allow it to dry. 
 
  • Attach the upper part 1 with the upper part 2 in such a way that it takes the form of a vase. 


Top view of the vase

       Your beautiful quilling vase is ready.  Once vase is done, now you can add a nice shine to the flower vase by applying some quilling varnish. For that I have used clear nail  polish. This will make your vase water proof and strong. 

Place some colorful quilling flowers in your vase and it will make a beautiful piece of decor for your home. Your complete vase will look like this :
 
 I hope you liked this unique quilling flower vase. Please share your views.


Quiling Shiva Linga


Hello everyone,

Shiva linga, meaning a sign, a symbol or a mark which is an abstract representation of the Hindu deity, Lord Shiva. Lord Shiva is worshiped in the form ling . For more details please Click here.
As you know quilling art is an endless creation,so lets make something unique. 

How about a quilling Shiva linga? Does thats sounds good ?
Yes, Then Lets get  going with the steps.
For this you need 10 mm black colour quillng strips .
Let me explain in detail.

Step 1  ( Top part (lingam) ):

                Make a tight coil using 10 quilling strips. Make three such coils and attach them one above the other.  Make the top coil a little conical.
 
 Step 2 ( Middle part (Yoni) ):


Step 2

             Make a tight coil using 21 quilling strips. Push on the top part of the coil to make a small projection inside. This is the center part of the diety.
Then you need to make a tight coil using 4 quilling strips. Make four such coils and attach in the pattern shown in the picture.

Step 3 ( Lower part (Shristi and Sthiti) ):
 
Step 3

Make a tight coil using 10 quilling strips. Make two such coils. Make two cones and attach them as shown in the picture. 
 
Step 4 :

   Attach all the parts to complete the idol.

Step 5 :

    Take a white colour quilling strip of 5 mm dimension. Cut it into 3 small strips and stick on the Top part of the idol. This completes the quilling Shiva linga.
You can make some quilling / fringed flowers and decorate your Shiva linga.
I hope you all liked my quilling Shiva linga. Please share your views.

Sunday 9 April 2017

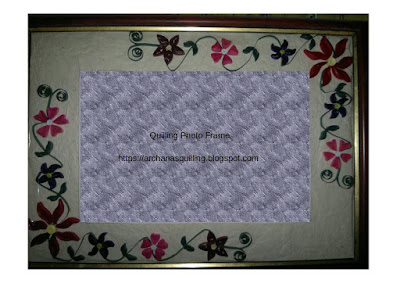
Quilling Photo Frame


Hi friends,


I am sure you all must be having very lovely and beautiful memories to be framed.  A photo frame is a beautiful piece of art to preserve your sweet memories. How about a creating your own Photo frame using Quilling ?
In this post I am showing you how to make a beautiful quilling photo frame.

The materials required are:
  • Handmade paper ( 30 / 20 cm ) , 2 sheets
  • Quilling strips ( 3 mm )
  • Quilling needle
  • Fevicol
  •  Cardboard
  • Scissors   

The procedure for making the photo frame are described below:

Step 1 :
        Cut a handmade paper of any colour of your choice of dimension 30/20 cm.

Step 2 :
       Cut a similar handmade paper of the same dimension. Cut the inner rectangle a size little smaller than your photo.

Step 3 :
     Stick the second paper onto the first paper as shown in the picture. While sticking , please ensure that you leave one end open to insert the photo.

Step 4 :
    Make some quilling flowers , leaves and arrange in the pattern of your choice. I have made some comb flowers and shapes flowers to decorate the photo frame.

Step 5 :
    Once you flowers are arranged , make a stand for the photo frame with a cardboard.


Your beautiful quilling photo frame is ready !!!

The photo frame shown above is a simpler one, one can do the decorations as per their choice , like I had done the top one for my wedding anniversary and had it framed .

A quilling photo frame can be a beautiful piece of gift for any occassion for your loved ones.
Hope you liked my creativity . Please share your views.😊